Create calendar events on U3A Javea website
WordPress Terminology
- Page. A static block of information on the website e.g. About Us, Location details
- Post A news item e.g report of a meeting or event. Posts are displayed on the website in chronological order, normally filtered by Category. In time, Posts are replaced by more recent posts.
- Category. A label used to group and filter posts. For example a post might have one category added to indicate the group name and not normally more than one extra category to add the post to the appropriate section of the front page of the website.
- Events. Calendar events are used to describe non-routine events that will occur on a particular date and time. Calendar events are displayed in a calendar view and may be filtered by calendar category in the same way as Posts.
- Block / Gutenberg editor. This is the new editor used in WordPress to produce body content of posts, pages and events. Different blocks are used to produce different types of content such as text, images, columns etc. An introduction to the block editor can be found here https://www.wpbeginner.com/beginners-guide/how-to-use-the-new-wordpress-block-editor/
- Featured Image. When a summary of a Post or an Event is published on the website, the summary will normally include a thumbnail view of the Featured image, together with the Title and an extract of the body text. The Featured Image illustrates the post or event and is displayed in landscape format. When adding an image to the Media Library, it is good practice to add a description to the image to simplify subsequent retrieval.
Add a Calendar Event
Log in to the WordPress dashboard. Use the login link in the footer of each page on the website. Note that if you attempt to log in with an incorrect username, any further attempts to log in from your location will be blocked for 4 hours. You can contact a webmaster and request the block is removed.
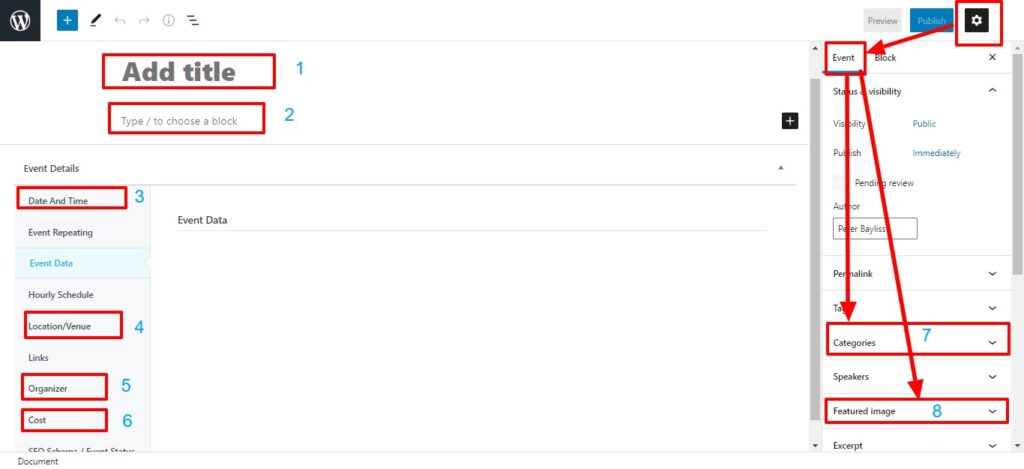
From the Dashboard, select Add Event from the M.E. Calendar section on the l.h.s. Your screen should then show the Event creation screen as below

- Add a brief but informative title for the event. Note. Add the date before saving the event
- Using the block editor, enter the body description of the event, including images etc as required. A tutorial for getting started with the block editor can be found here https://www.wpbeginner.com/beginners-guide/how-to-use-the-new-wordpress-block-editor/.
- Add the start and finish dates and times for the event.
- Select the location from the dropdown list
- Select the Organiser from the dropdown list. Normally the Group Leader
- If appropriate enter the cost for the event
- In the Event tab on the r.h.s, select the appropriate category(s) from the dropdown list
- Add a Featured Image. Either upload an image to the Media Library or select an existing image from the Media Library.
You can now Preview the event to see what it would look like and if necessary, continue editing.
Contact the webmaster if you need a Location or Organiser not in the drop down list.
When the editing is complete, Publish the event and it will be displayed on the website.
